Nothing gets a homeowner’s heart racing quite like the sudden gush of water from a burst pipe. It’s a scenario that threatens your home’s structure, your belongings, and your budget. While your mind might jump straight to the cost and complexity of the repair, the most important thing you can do happens long before a plumber arrives. This guide focuses on immediate, practical steps to mitigate the disaster. We’ll show you how to stop the flow of water, secure your home, and document the damage for insurance. Understanding how to repair a burst pipe is a professional’s job, but knowing how to manage the crisis is yours. Let’s get your home safe.
Key Takeaways
- Act on Water and Power First: Before doing anything else, shut off your home's main water valve to stop the flow and then turn off the electricity to any wet areas to prevent a serious safety hazard.
- A Temporary Patch Isn't a Permanent Fix: While a pipe clamp or epoxy putty can help manage a leak for a few hours, a burst pipe always requires a professional to fix the problem correctly and find the underlying cause.
- Focus on Prevention to Avoid a Repeat: You can prevent a future emergency with simple, proactive care. Insulating pipes in unheated spaces, scheduling annual plumbing inspections, and keeping your home's temperature stable during cold snaps are the most effective ways to protect your plumbing.
A Burst Pipe? Here’s What to Do Right Now
Discovering a burst pipe can send anyone into a panic. The sound of rushing water and the sight of it pooling on your floor is enough to make your heart race. Water can cause serious damage to your home’s structure, foundation, and belongings in a matter of minutes. But before you get overwhelmed, take a deep breath. By following a few critical steps, you can control the situation and minimize the damage while you wait for help to arrive. Your top priorities are stopping the flow of water, ensuring your family’s safety, and documenting the scene for what comes next.
This isn’t the time for a DIY repair manual; it’s about immediate, effective damage control. Think of yourself as the first responder for your home. Your actions in these first few moments are crucial. Once the situation is stable, you can call in a professional for the actual fix. If you’re facing a major leak, don’t hesitate to call for 24/7 emergency plumbing repairs. The most important thing is to act quickly and calmly. These next steps will walk you through exactly what to do to protect your property and get things under control.
Step 1: Shut Off the Main Water Valve
This is your absolute first move. Stopping the water at its source is the only way to prevent more from flooding your home. Find your main water shut-off valve and turn it off right away. This valve is usually located where the main water line enters your house, often in the basement, a crawl space, or a utility closet near the water heater. It typically has a wheel-style handle (turn it clockwise like a faucet) or a lever-style handle (turn it a quarter-turn until it’s perpendicular to the pipe). If you can’t find it, check your property inspection report, which should note its location.
Step 2: Cut Power to Wet Areas
Water and electricity are a dangerous combination. If water is pooling near electrical outlets, appliances, or your breaker box, you need to cut the power to those areas immediately. Head to your electrical panel and flip the breakers for all affected rooms. If you have to step through standing water to get to the panel, do not proceed. In that case, it’s much safer to leave your home and call an electrician alongside your plumber. Your safety is always the top priority, so if you have any doubts, it’s best to get everyone out of the house.
Step 3: Document Everything for Insurance
Once the immediate dangers of flowing water and electricity are handled, grab your phone. Before you move anything or start cleaning up, document all the damage with photos and videos for a potential insurance claim. Get wide shots of the entire affected area and close-ups of damaged drywall, flooring, furniture, and personal belongings. A thorough record will be incredibly helpful when you contact your insurance company to start the claims process. The more evidence you have, the smoother that process is likely to be.
Step 4: Start Removing the Water
As soon as it's safe, you can begin the initial cleanup. The goal is to get as much standing water out as possible to prevent it from soaking deeper into your floors and walls, which can lead to mould. Use buckets, mops, and old towels to remove the bulk of the water. A wet-dry vacuum is an excellent tool for this if you have one. Open windows and doors to get air circulating, and if it’s safe to do so, run fans or a dehumidifier to help dry out the space. This initial effort can make a big difference in preventing long-term issues.
How to Find and Assess the Burst Pipe
Once you’ve shut off the water and electricity, your next job is to play detective. Finding the source of the leak helps you understand the scale of the problem and gives a professional plumber a head start when they arrive. A burst pipe isn’t always a dramatic geyser in your basement; sometimes, the signs are much more subtle. Walk through your home and use your senses to look for clues. Pay close attention to rooms with plumbing, like bathrooms, kitchens, and laundry rooms, as well as the walls, ceilings, and floors surrounding them.
Look for Signs of Water Damage
The most obvious sign of a burst pipe is, of course, water. Look for puddles, drips from the ceiling, or water running down walls. But don’t stop there. Check for less obvious signs like dark, damp spots on drywall, peeling paint or wallpaper, and warped floorboards. A sagging or stained ceiling is a major red flag that water is pooling above it. Remember, water damage spreads quickly, and mold can begin to grow in as little as 24 hours, so addressing the source is critical. If you see significant damage, it’s time to call for professional plumbing repairs right away.
Listen for Hissing or Dripping Sounds
If you can’t see the leak, you might be able to hear it. Turn off any noisy appliances like the TV or radio and listen carefully. You might hear unusual hissing, whistling, or dripping noises coming from inside your walls. These sounds are often the first indication of a pinhole leak or a crack in a pipe that’s hidden from view. Try to follow the sound to its loudest point to narrow down the location of the break. This information is incredibly helpful for a plumber, as it can reduce the time needed to find and access the damaged pipe.
Check for a Drop in Water Pressure
Have you noticed that your shower isn’t as strong as it used to be or that your kitchen faucet is sputtering? A sudden or gradual drop in water pressure can be a symptom of a burst pipe. When a pipe breaks, water escapes the system before it reaches your fixtures, causing the pressure to fall. While you’ve already shut the main valve off by this point, think back to the hours or days before you discovered the leak. A drop in pressure could have been an early warning sign that something was wrong with your plumbing system.
Inspect Any Exposed Pipes You Can See
Take a flashlight and check all the visible pipes in your home, including those under sinks, in the basement or crawlspace, and around your water heater. Look for drips, condensation, rust, or bulging sections of pipe. Sometimes, the break is a small crack or split that’s easy to miss at first glance. If you have older plumbing, like Poly B piping, it can become brittle over time and is more prone to cracking. A thorough visual check can often reveal the culprit without needing to open up any walls.
Why Do Pipes Burst in the First Place?
Understanding why a pipe burst can help prevent it from happening again. Here in the Okanagan, freezing temperatures are the most common cause. When water freezes inside a pipe, it expands and creates immense pressure that can cause the pipe to split. However, other issues can also lead to a burst pipe. Old, corroded pipes can weaken and fail over time. Stubborn clogs can block water flow and build up pressure, while unregulated high water pressure can put a constant strain on your entire plumbing system. A professional can help diagnose the root cause of the break.
How to Make a Temporary Fix While You Wait for a Pro
After you’ve shut off the water and called for help, you might still be dealing with a slow drip or a steady trickle from the damaged pipe. While you wait for a professional to arrive, a temporary patch can help minimize water damage and give you a little more peace of mind. These quick fixes are not permanent solutions, but they can be incredibly effective at containing a leak for a few hours.
Think of it as plumbing first aid. You’re applying a bandage to stop the bleeding until the doctor—in this case, a certified plumber—can properly treat the wound. Attempting a temporary repair is only safe after you’ve turned off the main water supply and the electricity to the affected area. Below are a few common methods using materials you can find at most hardware stores. Remember, the goal is to manage the situation, not to perform a full plumbing repair yourself. A professional has the tools and expertise to fix the pipe correctly and ensure it won’t cause problems down the road.
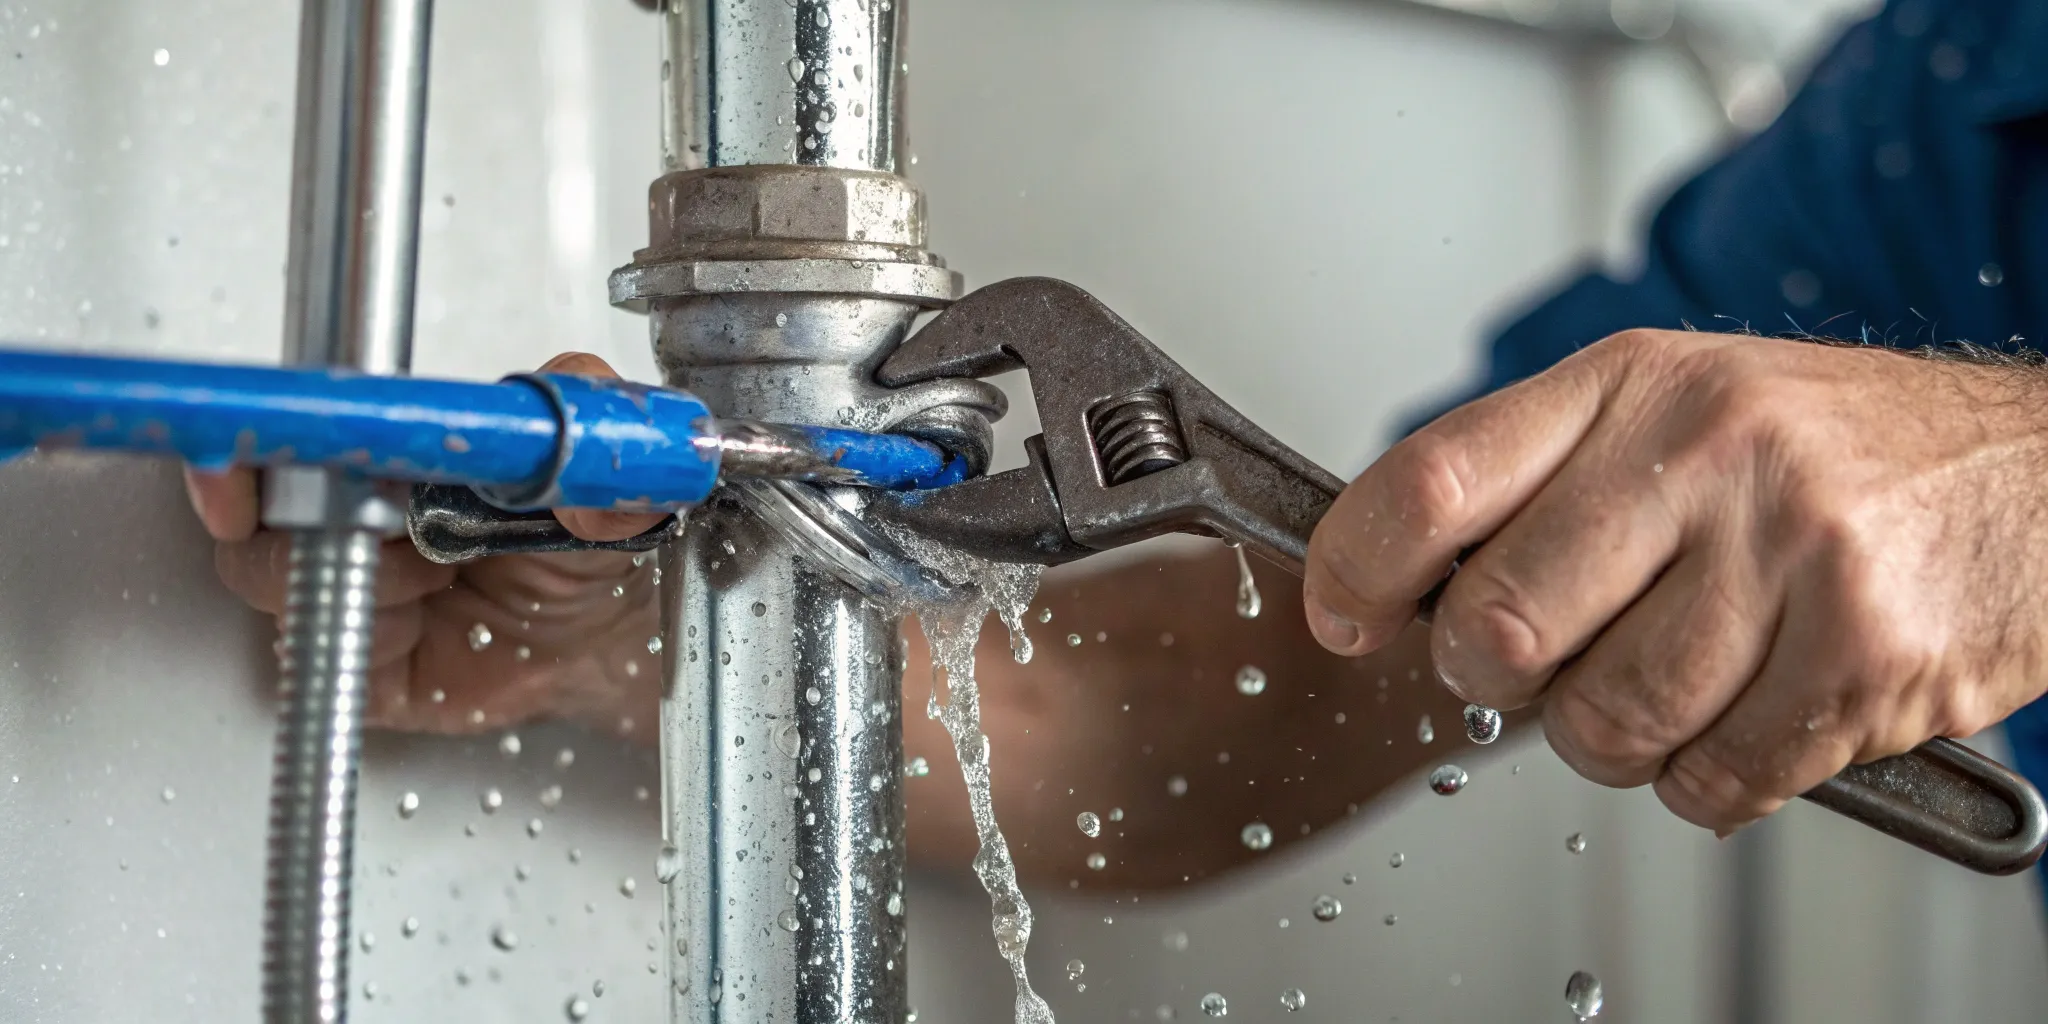
Use an Emergency Pipe Clamp
An emergency pipe clamp is one of the most reliable temporary fixes for a burst pipe. These clamps are designed specifically for this situation and are relatively easy to use. The kit usually includes a rubber pad or gasket and a hinged metal clamp. To use it, you’ll place the rubber pad directly over the crack or hole in the pipe, making sure it covers the entire damaged area. Then, fit the two halves of the metal clamp over the pad and tighten the screws until it’s securely in place. This creates a strong seal that applies pressure to the leak, effectively stopping the flow of water until a permanent repair can be made.
Apply Epoxy Putty or Pipe Wrap
Epoxy putty is another great tool to have in your emergency kit. It’s a clay-like compound that you knead to activate, then apply directly over the crack in the pipe. Once it’s on, you can mold it to cover the hole completely. The key is to ensure the pipe is as dry as possible before you apply the putty so it can bond properly. After applying, it needs several hours to cure and harden into a durable patch. A similar option is a pipe wrap kit, which often includes a fiberglass tape coated in a water-activated resin. You simply soak the tape and wrap it tightly around the damaged section of the pipe, where it will harden in minutes.
Try a Split-Sleeve Clamp
A split-sleeve clamp is a heavy-duty version of a basic pipe clamp and works on the same principle. It consists of a neoprene rubber gasket and two metal sleeves that bolt together around the pipe. This is an excellent option for longer cracks or more significant damage that a smaller clamp can’t cover. You’ll wrap the gasket snugly around the pipe, ensuring it completely covers the leak. Then, place the two metal sleeves over the gasket and tighten the bolts evenly. The pressure from the clamp will seal the leak. This method provides a very sturdy, though still temporary, fix while you wait for professional drain and sewer services to assess the pipe’s integrity.
Safety Rules for Any DIY Patch
Before you attempt any of these temporary fixes, your safety is the top priority. First and foremost, always shut off your home's main water supply. This is the most critical step to stop the flow of water and prevent further flooding. Next, open a few faucets in your home, especially those near the burst pipe, to drain any remaining water and relieve pressure in the system. If the burst pipe is near any electrical outlets, appliances, or your breaker box, turn off the power to that area immediately to avoid the risk of electric shock. Water and electricity are a dangerous combination, and it’s always better to be cautious.
When to Call a Professional Plumber
While a temporary patch can be a lifesaver, a burst pipe is a serious plumbing emergency that almost always requires a professional. Attempting a permanent fix without the right tools or expertise can lead to even greater water damage and more expensive repairs down the road. Your home’s safety and structural integrity are on the line, so knowing when to hand the job over to an expert is crucial. A professional plumber not only fixes the immediate leak but also assesses the underlying cause to prevent it from happening again.
At TruFinity, we handle these situations every day with our 24/7 emergency service. Our goal is to resolve the crisis quickly and give you back your peace of mind. If you’re facing a burst pipe, the safest and most effective solution is to call for professional help as soon as you’ve shut off the water.
Know the Signs You Need an Expert
Some plumbing problems are clearly beyond a DIY fix. If you see a significant amount of water pouring from a pipe, don't hesitate—call a professional immediately. Other urgent signs include new, unexplained water stains appearing on your walls or ceiling, which often point to a hidden leak that’s been causing damage for some time. You might also hear unusual gurgling or hissing sounds from behind a wall. These are all clear indicators that you need an expert to step in and handle the complex plumbing repairs required to protect your home.
Dealing with Leaks Hidden Behind Walls
A burst pipe inside a wall is one of the most challenging plumbing issues. The exact location of the leak is often difficult to pinpoint, and cutting into drywall without knowing what’s behind it can damage electrical wiring or other pipes. This is a job that requires professional diagnostic tools and experience. Plumbers use equipment like electronic leak detectors and moisture meters to find the source of the problem with minimal disruption. Trying to fix a hidden leak yourself can quickly turn a manageable repair into a major renovation project, so it’s always best to leave these situations to the pros.
What to Do When Water Damage is Severe
If you discover significant water damage, your first call should be to a licensed plumber for an emergency repair. Once help is on the way, your next call should be to your insurance company to begin the claims process. It’s incredibly important to document everything thoroughly. Use your phone to take plenty of pictures and videos of the burst pipe, the standing water, and any damaged belongings, furniture, or structural materials like flooring and drywall. This evidence will be essential for your insurance claim and will help ensure you get the coverage you need for restoration.
How Professionals Find and Fix Leaks for Good
Finding the exact source of a leak, especially a hidden one, requires more than just a good eye. Our technicians use specialized tools like HD waterproof cameras to inspect the inside of your pipes and electronic systems to detect leaks without tearing down your walls. Once we’ve identified the problem, we can provide a lasting solution. This might involve replacing a section of the pipe or, if you have an older system like Poly B, recommending a full re-pipe to prevent future bursts. A professional fix isn’t just about stopping the water; it’s about ensuring your plumbing is reliable for years to come.
How to Prevent Pipes from Bursting Again
After the stress and mess of a burst pipe, the last thing you want is a repeat performance. Taking a few proactive steps can protect your home from future water damage and give you lasting peace of mind. Think of it as preventative care for your home’s plumbing system. By focusing on insulation, regular check-ups, and smart habits, you can significantly reduce the risk of another plumbing emergency, especially when the Okanagan winter arrives with its freezing temperatures.
These aren't complicated or expensive fixes, but they make a world of difference. It’s about shifting from reacting to an emergency to proactively managing your home’s health. A little attention now saves you from major headaches, costly repairs, and the anxiety that comes with unexpected water damage. Let’s walk through the most effective ways to keep your pipes safe, your home dry, and your family comfortable for years to come.
Insulate Your Pipes Before Winter
One of the biggest culprits behind burst pipes is freezing temperatures. When water freezes, it expands, putting immense pressure on your plumbing. The best defense is proper insulation, especially for pipes in unheated areas like crawl spaces, basements, attics, or garages. You can find simple foam pipe sleeves at any hardware store that are easy to cut and fit. Taking an afternoon to insulate vulnerable pipes is a small investment that prevents a massive headache when temperatures drop below zero.
Schedule Regular Plumbing Inspections
You take your car for regular tune-ups, and your home’s plumbing deserves the same attention. An annual inspection by a professional plumber can catch small issues before they become catastrophic failures. A trained eye can spot early signs of corrosion, stress fractures, or pinhole leaks that are easy to miss. This is also a great time to have your water pressure checked, as consistently high pressure can weaken your pipes over time. Being part of a home service membership program often includes these annual check-ups, making it an easy way to stay on top of your home’s health.
Consider Upgrading Old or Outdated Pipes
Plumbing doesn't last forever. If your home was built several decades ago, it might have galvanized steel or Poly B pipes, which are known to corrode or become brittle over time. Take a look at any visible pipes in your basement or under sinks. If you see signs of rust, discoloration, or dimpling, it might be time for an upgrade. Modern materials like PEX and copper are far more durable. A full residential plumbing update is a significant project, but it’s one of the most reliable ways to protect your property from the widespread damage a systemic pipe failure can cause.
Keep Your Home's Temperature Stable
Your heating system is a key ally in preventing frozen pipes. During a cold snap, it’s important to maintain a consistent temperature throughout your home. If you’re heading out of town during the winter, don’t turn the heat completely off. Set your thermostat to at least 13°C (55°F) to ensure the ambient air temperature is warm enough to keep the water in your pipes from freezing. For pipes located in cabinets against exterior walls, like under the kitchen sink, simply leaving the cabinet doors open allows warm air to circulate and provides extra protection.
What to Expect for Repair Costs
When you’re dealing with a burst pipe, the last thing you want to think about is the bill. But knowing what to expect can help manage the stress of the situation. On average, a professional burst pipe repair costs around $500, though the final price often lands somewhere between $200 and $1,000. For a very simple, accessible leak, you might pay as little as $150. However, if the damage is extensive or the pipe is hard to reach, the cost can climb toward $2,000 or more.
The cost often breaks down by the foot for replacement, which can be $150 to $250 per foot, plus labor. For a standard repair, the plumber's time and expertise might account for $300 to $400 of the total. While it’s an unexpected expense, remember that paying for a professional fix prevents much costlier water damage down the road. It’s an investment in protecting your home and your peace of mind.
What Factors Influence the Final Bill?
The estimate a plumber gives you isn't just a random number; it’s based on several key factors. The biggest one is accessibility. A burst pipe under the kitchen sink is far easier and cheaper to fix than one hidden behind a tiled shower wall or buried under your concrete slab. The more work required to reach the pipe—like cutting through drywall or flooring—the higher the labor costs will be.
The type of pipe and the extent of the damage also play a role. A small crack is a simpler fix than a complete rupture that requires replacing a whole section of pipe. At TruFinity, our experts provide fast, reliable plumbing repairs and will always explain the costs upfront so you know exactly what to expect before we begin work.
Working with Your Insurance Company
Your next call after the plumber should be to your insurance agent. The good news is that standard homeowners insurance policies typically cover sudden and accidental water damage, which is exactly what a burst pipe is. Before you clean up, make sure you take plenty of photos and videos of the leak and any damaged property, as this documentation is essential for your claim.
However, there’s an important catch: coverage may be denied if the burst pipe was caused by neglect or a lack of maintenance. If an old, corroded pipe you knew about finally gives way, your claim might not be approved. This is why staying on top of your home’s plumbing health is so important.
Understanding Emergency Fees and Financing Options
Burst pipes don’t wait for convenient, 9-to-5 business hours. When you need help on a weekend or in the middle of the night, you can expect to pay an emergency service fee. These fees compensate technicians for working outside of normal hours and can add a significant amount to your final bill. One way to avoid this is with a service plan; our TruFinity membership, for example, waives all after-hours fees for members.
We understand that a major plumbing repair is often an unplanned expense. That’s why we offer flexible financing options to help you manage the cost without delay. Getting the repair done right away is critical, and financing ensures you don’t have to choose between your budget and protecting your home.
Related Articles
- 24/7 Emergency Plumber: What to Do When Disaster Strikes
- How to Prevent Emergency Plumbing Situations
- Understanding the Risks of DIY Emergency Plumbing Repairs
- How to Repair a Leaky Bathtub Faucet
Frequently Asked Questions
What if I can't find my main water shut-off valve or it won't turn? It’s a stressful moment when you can’t stop the water flow. First, check your home inspection report, as it usually notes the valve's location. If you still can't find it or the handle is stuck, don't force it, as you could break the valve and make things worse. Your next best option is to call for emergency plumbing service right away. A professional can locate and shut off the water for you, often using a special tool at the curb stop valve near the street, and can address the stuck valve as part of the repair.
Is a temporary patch, like a clamp or putty, a good enough fix? Think of a temporary patch as first aid for your plumbing—it’s meant to control the problem until an expert arrives, not to cure it. While clamps and epoxy putty can effectively stop a leak for a few hours, they don’t address the underlying reason the pipe failed, such as high water pressure or corrosion. Relying on a temporary fix is risky because it can fail without warning, leading to another flood. A professional repair is the only way to ensure the pipe is secure for the long term.
How long does it typically take for a professional to fix a burst pipe? The timeline really depends on where the pipe is and how bad the break is. A simple repair on an exposed pipe in your basement might only take an hour or two from start to finish. However, if the burst pipe is hidden behind a wall or under a floor, the job becomes more complex. The plumber will first need to locate the leak precisely and then open the wall to access it, which adds time. A professional will always assess the situation first and give you a clear idea of the scope of work and the expected timeline.
My pipe burst from freezing. Does this mean other pipes are at risk too? Yes, it’s a strong possibility. If one pipe was vulnerable enough to freeze and burst, it’s very likely that other pipes in similar unheated or poorly insulated areas of your home are also at risk. This could include pipes in your crawl space, attic, garage, or along exterior walls. After the emergency is handled, it’s a smart move to have a professional inspect your entire plumbing system to identify and insulate other vulnerable spots before the next cold snap hits.
Besides the pipe itself, what other damage should I be worried about? The water damage you can see is often just the beginning. Water is incredibly invasive and can quickly seep into your subfloor, insulation, and drywall. If these materials aren't dried out properly and quickly, you can face serious long-term problems like wood rot, compromised structural integrity, and mold growth, which can begin in as little as 24 hours. This is why a rapid and thorough response is so critical—it’s not just about fixing the leak, but also about preventing these costly secondary issues.


.webp)