A broken outdoor pipe presents a choice: do you try to fix it yourself and save some money, or call a professional right away? The right answer depends on the problem. A simple DIY repair can be a great way to cut costs, but a mistake can lead to much bigger, more expensive water damage. This guide is designed to help you make that smart decision. We’ll show you how to fix a broken pvc water pipe outside, giving you the knowledge to handle a minor leak confidently. More importantly, we’ll help you identify the red flags that mean it’s time to call in the experts to protect your property.
Key Takeaways
- Get the DIY Repair Right the First Time: A successful, lasting fix depends on a few non-negotiable steps: always shut off the water, make clean cuts, and use both PVC primer and cement to create a proper chemical weld.
- Protect Your Pipes from Seasonal Damage: Simple proactive maintenance is your best defense against future breaks. Shielding exposed pipes from sun and draining irrigation lines before a freeze can prevent weather-related cracks and bursts.
- Know Your Limits to Prevent a Bigger Mess: A small, visible crack is often a manageable DIY project, but gushing water, multiple leaks, or any repair that feels overwhelming is a clear sign to call a professional and avoid major property damage.
Why Do Outdoor PVC Pipes Break?
Discovering a sudden puddle in your yard or a drop in water pressure can be frustrating, but it’s often the first sign of a broken outdoor pipe. While PVC is a durable material, it isn’t indestructible, especially when buried underground. The pipes that handle your irrigation, main water supply, or drainage are constantly exposed to environmental stress that can lead to cracks, splits, or complete breaks over time.
Understanding what causes these breaks is the first step toward a lasting fix. Most issues come down to three main culprits: pressure from the surrounding environment, the unique climate challenges we face here in the Okanagan, and simple wear and tear. Before you grab a shovel, let’s look at the common reasons your outdoor PVC pipe might have failed and the warning signs that point to a problem. This knowledge will help you decide whether it’s a simple DIY fix or a job that needs a professional eye.
Common Causes of Damage
More often than not, the ground itself is the source of the problem. Over time, subtle shifts in the soil can put immense pressure on a buried pipe, causing it to bend and eventually crack. Aggressive tree roots are another major cause; they can wrap around and constrict a pipe or even grow directly into a joint, forcing it apart. In the Okanagan, both soil shifting and invasive roots are common culprits. Accidental impact from landscaping projects, like hitting a line with a shovel, or the weight of heavy vehicles driving over a shallowly buried pipe can also cause immediate damage. Finally, older PVC can simply become brittle and fail with age.
Warning Signs of a Broken Pipe
A broken outdoor pipe usually leaves a few clues. The most obvious sign is pooling water or a perpetually soggy patch of lawn when it hasn't been raining. You might also notice a specific area of your yard that is suddenly greener and lusher than the rest—a sign that it's getting extra "fertilizer" from a leaking sewer line or constant water from a supply line. Inside your home, a broken main water line can cause a noticeable drop in water pressure or discolored tap water. Keep an eye on your utility bill, too; a sudden, unexplained spike is a strong indicator that you have a leak somewhere on your property that needs immediate plumbing repairs.
How Okanagan Weather Affects Your Pipes
Our local climate plays a significant role in the health of your outdoor plumbing. The freeze-thaw cycles we experience throughout the colder months are particularly hard on PVC pipes. When water inside a pipe freezes, it expands with incredible force, putting enough pressure on the pipe walls to cause a split or crack. Even if the pipe doesn't burst immediately, repeated freezing and thawing can weaken it over time. Frost heave, where the soil freezes and expands, can also lift and shift pipes, stressing the joints and leading to breaks. Proper installation depth and winterization are key to preventing these weather-related plumbing issues.
Your DIY Pipe Repair Toolkit
Before you start cutting into pipes, it’s smart to get organized. Having the right tools and materials ready to go is the secret to a smooth, successful repair. It’s what separates a quick fix from a frustrating afternoon that ends with an urgent call for professional plumbing repairs. Taking a few minutes to gather everything you need will save you time and help you get the job done right the first time. Think of it as setting yourself up for success.
Essential Tool Checklist
You don’t need a professional-grade workshop for this job, but a few key items are non-negotiable. You’ll need a PVC pipe cutter or a hacksaw for making clean, straight cuts. A measuring tape and a marker are also essential to ensure your replacement piece is the perfect length. For the actual repair, you'll need both PVC primer and cement, which work as a team. Finally, keep some clean rags or towels nearby for wiping down the pipe and cleaning up any drips. Having these basics ready will make the entire process much more efficient.
Must-Have Safety Gear
Your safety should always be your top priority. PVC primer and cement release strong fumes that you shouldn’t inhale, so it's important to work in a well-ventilated area. We strongly recommend wearing safety glasses to protect your eyes from any accidental splashes of chemicals. A pair of work gloves will keep your hands clean and protected, too. A simple dust mask can also provide an extra layer of protection against fumes. These small precautions are essential for any DIY project and ensure your repair doesn’t come with any unwanted health risks.
Materials for a Lasting Fix
To create a waterproof seal that lasts for years, you’ll need more than just glue. The key is a two-step process using PVC primer and cement. The primer, which is usually purple, cleans and softens the plastic just enough for the cement to create a strong chemical weld. You’ll apply the primer to the outside of the pipe and the inside of the fitting. Immediately follow it with a thin, even layer of cement. When you push the pieces together, give them a quarter-turn twist to spread the cement and hold them firmly for about 30 seconds.
Where to Get Your Supplies
You can find everything you need for this repair at your local hardware or home improvement store. The most critical items are the replacement PVC pipe and the fittings, which are often called couplers or joints. To guarantee you get the right size, it’s a great idea to cut a small piece of the damaged pipe and take it with you to the store. This way, you can match the diameter exactly and avoid a frustrating second trip. Don’t hesitate to ask an employee for help—they can point you to the right aisle and confirm you have the correct parts.
A Step-by-Step Guide to Fixing Your PVC Pipe
Ready to tackle that broken pipe? With the right tools and a bit of patience, you can handle a simple PVC repair yourself. This guide will walk you through the essential steps for a clean, lasting fix. Remember, safety comes first, and it’s important to work carefully to avoid turning a small leak into a big problem. We're covering straightforward repairs here—the kind you can see and easily access.
Before you start digging, take a moment to assess the situation. Is the break a simple crack, or is the pipe crushed? Is it connected to your main water line or an irrigation system? If you find the damage is extensive, the pipe is buried deep, or you’re just not comfortable with the repair, don’t hesitate to call for professional help. Our team is always ready to provide fast, reliable plumbing repairs to get your system back in order without the guesswork. For now, let’s get started on that DIY fix.
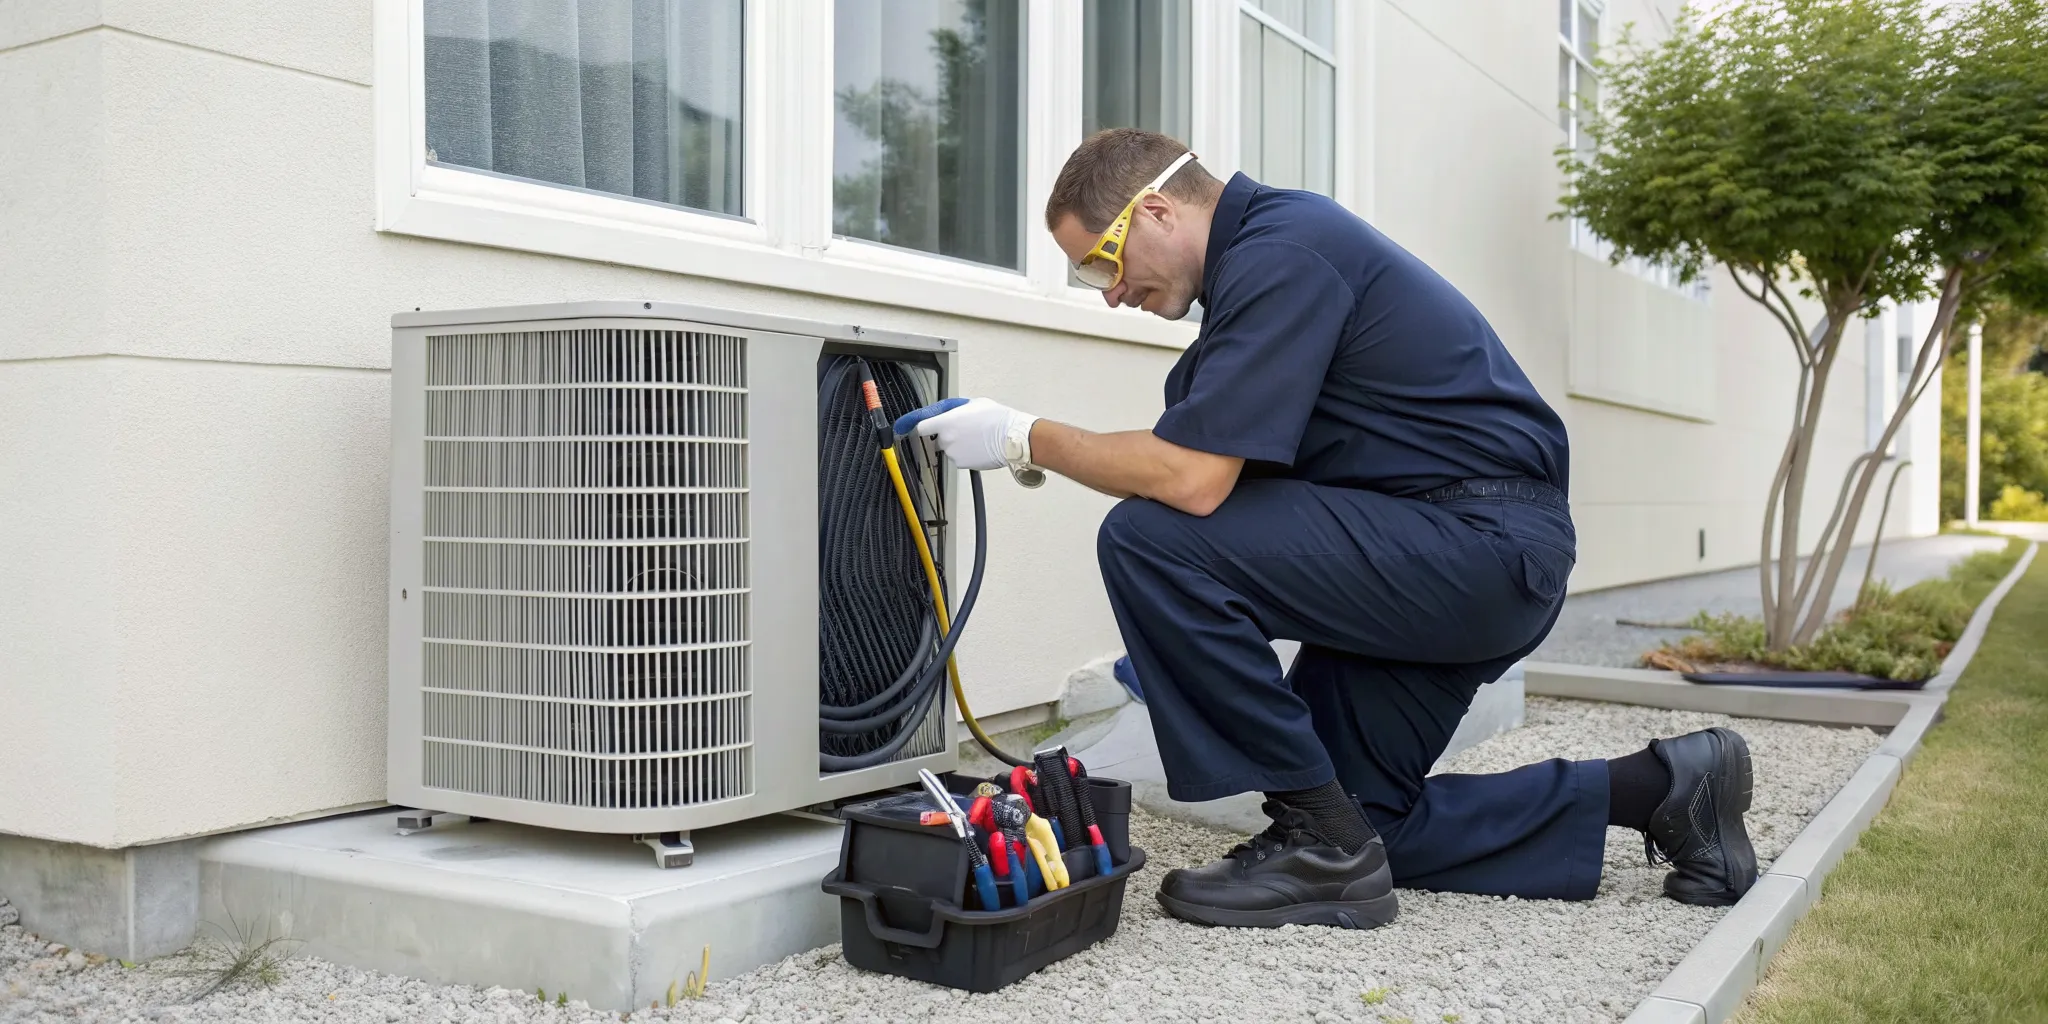
Step 1: Find the Leak
First things first, you need to pinpoint exactly where the water is coming from. For outdoor pipes, the leak often reveals itself with soggy patches of grass, muddy areas, or visible water pooling on the ground. Carefully clear away any dirt, grass, or debris from around the pipe to get a clear view.
Once the pipe is exposed, wipe it dry with a rag and watch closely for water beading or dripping. A small crack can be hard to spot, so take your time. If it’s a hairline fracture, you might only see a tiny stream of water. Mark the damaged section with a permanent marker so you don’t lose track of it while you work.
Step 2: Prepare the Repair Area
This is the most important step for preventing a watery mess. Before you make a single cut, you must shut off the water supply to the pipe you’re working on. Find the main water shut-off valve for your house—it’s usually located in the basement, a crawl space, or near your water meter—and turn it clockwise until it’s fully closed.
Next, drain any remaining water from the line by opening an outdoor spigot or the lowest faucet in your home. This relieves the pressure in the system and ensures you won’t get a surprise shower when you cut into the pipe. Let the water run until it stops completely. A dry work area is a safe and effective work area.
Step 3: Cut and Replace the Damaged Section
With the water off and the pipe drained, it’s time for the repair. Use a PVC cutter to make a clean, straight cut on both sides of the damaged section you marked earlier, removing the entire broken piece. Measure the gap between the two ends of the existing pipe and cut a new piece of PVC to that exact length.
Before applying any adhesive, do a “dry fit.” Slide a coupling onto each end of the existing pipe and insert your new piece to make sure everything lines up perfectly. Once you’re confident in the fit, apply PVC primer and cement to the outside of the pipes and the inside of the couplings, then quickly push them together with a slight twist. Hold firmly for 30 seconds to create a strong bond.
Step 4: Test Your Work
Patience is key here. Most PVC cement manufacturers recommend waiting at least an hour to allow the joint to cure properly before you introduce water pressure. Check the instructions on your product for the specific cure time. Rushing this step could cause your brand-new repair to fail.
Once the recommended time has passed, it’s the moment of truth. Go back to your main shut-off valve and turn it on slowly. A sudden blast of water can stress the new joints. Let the pipe fill, then head back to your repair site and inspect it carefully for any drips or moisture. If everything is dry and secure, you can backfill the area with dirt. Great job
How to Prevent Future Pipe Problems
Fixing a broken pipe is a great skill to have, but preventing the problem in the first place is even better. A little proactive care can save you from the stress and expense of an emergency repair down the road. By paying attention to your pipes throughout the year and knowing when to get a professional opinion, you can protect your property and keep your plumbing system running smoothly. These simple strategies will help you avoid future leaks and breaks, giving you one less thing to worry about.
Protect Your Pipes Seasonally
The Okanagan weather, from intense summer sun to freezing winter nights, can be tough on your outdoor plumbing. Over time, direct sunlight can make PVC pipes brittle and prone to cracking. A simple and effective way to prevent this UV damage is to paint any exposed pipes with a coat of exterior latex paint. For winter, it’s crucial to winterize your outdoor faucets and drain any irrigation lines to prevent water from freezing, expanding, and bursting the pipe. Taking these small seasonal steps provides a strong defense against weather-related damage.
Simple Maintenance Tips
You don't need to be a plumbing expert to spot potential trouble. Make it a habit to visually inspect your outdoor pipes and faucets whenever you're working in the yard. Look for small drips, moisture on the ground, visible cracks, or any signs of wear. Catching a small issue early is always easier and less expensive than dealing with a major break. Also, be sure to keep the area around your pipes clear of overgrown shrubs or debris, as roots can put pressure on pipes and debris can hide slow leaks until they become significant problems.
The Value of a Professional Inspection
While DIY checks are helpful, some plumbing issues are hidden underground or are too subtle to spot without experience. If you’re ever unsure about the condition of your pipes or suspect a hidden leak, a professional inspection provides peace of mind. Our technicians use advanced tools like HD video inspection to pinpoint cracks and potential blockages without disruptive digging. An annual check-up, like those included in our TruLoyalty membership plans, ensures your entire system is in top shape, catching problems before they turn into emergencies.
Know When to Call a Pro
While a DIY fix can be satisfying, some jobs are best left to the professionals. Knowing the difference can save you from a much bigger headache and a lot more expense down the road. A small leak can quickly become a major flood, and what looks like a simple crack might be a sign of a more serious issue within your plumbing system. Your home is your biggest investment, and protecting it is the top priority. Before you get too deep into a repair, take a moment to assess the situation. If you feel even slightly out of your depth, it’s always the smarter choice to pause and call for an expert opinion. Our goal is to empower you, and sometimes the most powerful move is knowing when to call for backup.
Is It a Plumbing Emergency?
If you’re looking at a gushing or spraying pipe, the answer is a definite yes. A burst pipe isn't just a leak; it's a full-blown plumbing emergency that can dump a shocking amount of water in a short time, threatening your home's foundation, landscaping, and basement. The potential cost of water damage restoration often far exceeds the cost of a professional repair. If you see significant flooding, hear the sound of rushing water when no taps are on, or notice a sudden, dramatic drop in water pressure, don't hesitate. Shut off your main water supply immediately and call a professional. Acting fast is key to minimizing damage and protecting your property.
Signs of a More Complex Problem
Sometimes, the issue isn't a dramatic burst but something more subtle. If you've repaired a leak only to have another one appear nearby, you might be dealing with a bigger problem. Pay attention to signs that suggest the pipe material itself is failing. This can include brittle-looking plastic, discoloration, or multiple small cracks along a section of the pipe. These are often symptoms of aging materials or damage from extreme cold, common in the Okanagan. Persistent soggy spots in your yard or a consistent loss of water pressure inside your home also point to a systemic issue that a simple patch won't solve. These situations often require professional diagnostics to find the true source of the problem.
How TruFinity Can Help
When a DIY job turns into a major project, our team is ready to step in. At TruFinity, our licensed, Red Seal Plumbers have the expertise to handle any pipe repair, big or small. We use advanced tools like HD video cameras to inspect your pipes without disruptive digging, pinpointing the exact cause of the issue. We understand how Okanagan weather affects your home's plumbing and provide solutions built to last. With our commitment to "True Service, Infinite Care," you can expect transparent advice and upfront pricing. If you’re facing a tricky repair or a plumbing emergency, schedule a service with us for peace of mind.
Protect Your Entire Plumbing System
Fixing one broken pipe is a great accomplishment, but it’s often a symptom of a larger issue. In the Okanagan, factors like shifting soil, invasive tree roots, and aging pipes can put your entire plumbing system under stress. A single outdoor leak could be a warning sign that other parts of your system are also vulnerable. Taking a proactive approach now can save you from facing a much bigger, more expensive emergency down the road. Instead of just reacting to problems, it’s wise to consider the overall health of your pipes to protect your home for the long term.
Explore Our Maintenance Plans
Regular maintenance is the best way to catch small issues before they become major disasters. Just like a car tune-up, your home’s plumbing benefits from routine professional check-ups. Our TruLoyalty Membership plans make this easy and affordable, providing peace of mind with scheduled inspections and priority service. As the Okanagan Basin Water Board advises homeowners, being proactive is key to managing your property's water systems effectively. A maintenance plan helps you stay ahead of seasonal challenges and ensures your plumbing is always in top condition.
Long-Term Solutions for Your Home
If your home has older pipes, a single repair might just be a temporary fix. As home renovation expert Mike Holmes advises, "I highly recommend that homeowners re-plumb their lines with copper, stainless steel, or a combination of plastic (PVC, PEX, or CPVC) piping." Upgrading to modern materials is a smart investment that prevents future leaks and improves water quality. If you’ve noticed multiple leaks or have concerns about the age of your pipes, it might be time to consider a more permanent solution than patching. A full or partial re-piping service can secure your home for decades.
Your Options for Professional Support
Plumbing challenges can differ significantly across Canada due to unique climate and infrastructure. Here in the Okanagan, our specific soil types and freeze-thaw cycles create distinct issues that require local expertise. When you’re facing a problem beyond a simple DIY fix, you need a team that understands these regional challenges. Our Red Seal certified plumbers have the experience to diagnose complex problems accurately and recommend the right solutions. Whether you need an emergency repair or a full system inspection, you can schedule a service with confidence, knowing you have local experts on your side.
Final Safety Checks and Best Practices
You’re almost at the finish line! Before you turn the water back on and call it a day, let’s run through a few final checks. Getting the repair done is one thing, but making sure it’s done safely and built to last is what really protects your home and gives you peace of mind. These last steps are just as important as the repair itself.
Taking a few extra minutes here can save you from having to do the job all over again or, worse, dealing with a bigger leak later. Think of this as your final quality control check to ensure your hard work pays off.
Non-Negotiable Safety Rules
Before you even think about cutting into a pipe, there are a couple of safety steps that are absolutely essential. Skipping these can turn a small repair into a major, water-logged headache.
First, always locate the main water shut-off valve for the line you're working on and turn it off completely. If you can't find the specific valve for your outdoor line, use the main shut-off for your entire house. This prevents water from gushing out while you work. Next, open the lowest faucet or spigot on that line to drain any remaining water. This relieves pressure and helps prevent any surprise splashes. A dry pipe is critical for the PVC primer and cement to work correctly.
Common DIY Mistakes to Avoid
We’ve all been there—a simple project goes sideways because of a tiny oversight. When it comes to PVC pipe repair, a few common mistakes can compromise the entire job. Here’s what to watch out for:
- Using the wrong glue or not using primer: PVC cement isn't just glue; it's a chemical solvent that welds the pieces together. Make sure you're using the right type for PVC and applying a PVC primer first. The primer cleans and softens the plastic, allowing for a much stronger bond.
- Not cleaning the pipe surfaces: Any dirt, dust, or moisture on the pipe ends will prevent a perfect seal. Always wipe the inside of the fitting and the outside of the pipe with a clean, dry cloth before applying primer.
- Rushing the cure time: It’s tempting to turn the water back on right away, but PVC cement needs time to cure. Check the instructions on the can for the recommended drying time. Patience here is key to a leak-free plumbing repair.
A Quick Word on Local Codes
While a simple, above-ground PVC pipe repair usually doesn't cause much fuss, it's good to know that more significant plumbing work can be subject to local building codes. If your repair involves a main water line, is buried underground, or you’re unsure about the extent of the damage, it’s always best to pause and consider professional help.
Complex issues or leaks in hard-to-reach places are often jobs for a licensed plumber. A professional ensures the repair is not only durable but also compliant with all local regulations, protecting your property's value and safety. If you find yourself in over your head, don’t hesitate to schedule a service with our team of certified experts.
Related Articles
- Understanding the Cost of Poly-B Replacement in Kelowna: A Homeowner’s Guide
- Kelowna Plumbing Tips: How to Prevent Common Plumbing Issues
- 6 Practical Tips to Prepare Your Plumbing System for Winter
- Poly-B Replacement in Kelowna: An Informational Guide
- 6 Tips to Prepare Your Plumbing for the Cold Season
Frequently Asked Questions
Is this DIY repair a permanent solution? When done correctly, a PVC solvent-weld repair is absolutely a permanent fix. The process of using primer and cement chemically fuses the new pipe and fittings together, creating a joint that is just as strong, if not stronger, than the original pipe. The key to making it last is in the preparation—ensuring the cuts are clean, the surfaces are dry, and you allow the cement to fully cure before turning the water back on.
What should I do if I can't find my main water shut-off valve? Not being able to find the shut-off valve can be stressful, especially when water is leaking. They are typically located where the main water line enters your home, such as in a basement, crawl space, or utility closet near the front of the house. If you've looked in all the likely spots and still can't find it, your safest bet is to call a professional plumber. It's better to have an expert locate it for you than to risk a much bigger water problem while you search.
Can I just use repair tape or a clamp for a small leak? While repair tapes and clamps are often marketed as quick fixes, they should only be considered a temporary, emergency patch to stop a leak until a proper repair can be made. These products don't offer the same long-term reliability as cutting out the damaged section and replacing it. The pressure and temperature changes in an outdoor pipe, especially here in the Okanagan, will likely cause a patch to fail over time.
My broken pipe isn't the standard white PVC. Can I still fix it myself? If your pipe is a different color, such as grey, you might be dealing with an older material like Poly-B piping, which is known for becoming brittle and failing unexpectedly. Repairing these types of pipes is not a straightforward DIY job, as they require specific fittings and expertise. If you don't have standard white PVC, we strongly recommend calling a professional for an inspection to identify the material and determine the best course of action.
How long do I really need to wait for the PVC cement to dry before turning the water back on? This is one of the most critical steps, and patience is essential. The cure time for PVC cement can vary depending on the specific product, pipe diameter, temperature, and humidity. Always read the instructions on the can for the manufacturer's recommendation, but a good rule of thumb is to wait at least one hour. Turning the water on too soon is the number one reason a new joint fails, so giving it ample time to set is crucial for a leak-free result.


.webp)